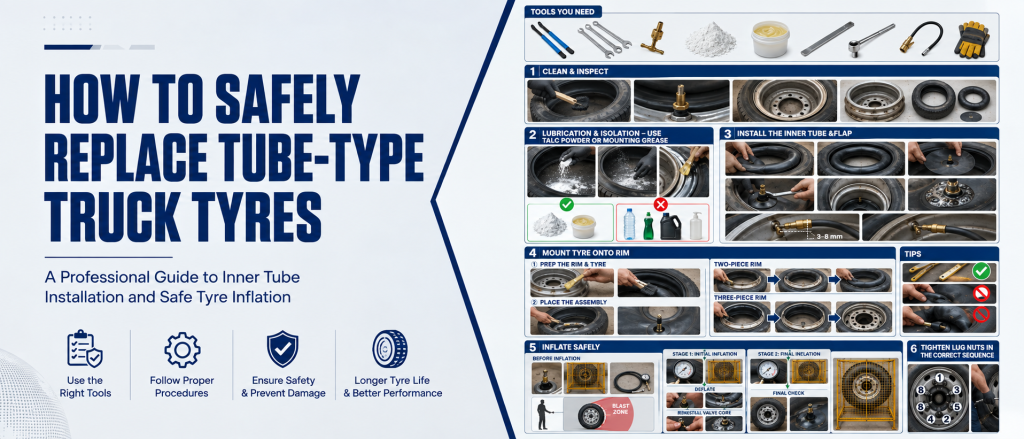
Professional guide for inner tube mounting and inflation safety.
Tools You Need
Include visuals for each:

Step-by-Step Tyre Replacement Process
1. Clean & Inspect
Ensure the tyre cavity is 100% clean – remove dirt, grease, or sharp objects.
Make sure that tube and screw nut is tightened.
Check the wheel for cracks, dents.
Make sure the rim, tyre, tube, and flap are all properly matched and undamaged.

2. Lubrication & Isolation – Use
Talc Powder or Mounting Grease
Tal Powder
Pat talc powder inside the tyre, on the inner tube, and on the flap.
Function: isolates surfaces, reduces friction, prevents rubber sticking & valve tearing.
Gently shake off excess talc to prevent clumping.
Vegetable-Based Mounting Lubricant
Apply lightly on tyre beads, rim contact area, and flap edges.
Function: aids bead seating, prevents damage during rim insertion.
Do NOT use water, detergent, petroleum, or silicone-based lubricants.
Which to use?
Talc powder: primarily for inner tube protection.
Lubricant: for bead/rim contact & rim entry — both can be used together DO NOT substitute one for the other.

3. Install the Inner Tube & Flap
Lay the inner tube into the tire cavity flatly.
Lightly inflate tube to ~3 psi to round it for facilitate the installation of the flap.
Assemble the flap with the tube valve fitting the center hole of the flap.
Check whether the edge of the flap is folded. If folding is observed, use a wrench to loosen the joint connecting the flap to the tire cavity.
After assembling the tire and wheel, adjust the tube valve again to the center of the wheel valve.
Test the valve core and valve of the inflated tire with soapy water to check if air leaks.
The front end of the air nozzle copper rod is maintained at a clearance of 3 mm to 8 mm from the rim body, allowing the copper rod to remain in a free state and thereby preventing potential breakage at the bend of the air nozzle.

4. Mount Tyre onto Rim
①Prep the Rim & Tyre
Lay rim flat, gutter side up.
Apply tyre lubricant to both beads, flap, and rim.
Avoid excess lubricant dripping into tyre.
②Place the Assembly
Put tyre, tube, and flap on the rim.
Make sure valve stem is centered in the valve slot.
Two-Piece Rim
Place side ring with the split opposite the valve.
Insert the smooth end into the groove.
Walk it in evenly until fully seated.
Three-Piece Rim
Lower side ring below the gutter.
Snap in the lock ring, starting with the smooth end.
Walk the ring in fully and check alignment.
Tips
Only use rubber, plastic, or brass tools.
Don't pinch the flap or twist the valve.
Recheck fit if parts don't seat smoothly.

5. Inflate Safely
Before Inflation
Remove the valve core.
Place the wheel assembly into a safety cage.
Use a clip-on chuck, inline gauge, and 30" air hose.
Do not strike the lock ring with a hammer.
Stage 1: Initial Inflation
Inflate slowly to max 40 psi.
Purpose: to seat the tyre beads and ensure all
rim parts are aligned and locked.
Visually confirm the rings and beads are fully seated.
Deflate
Fully release the air.
Purpose: to allow the tube to relax, eliminate folds, and reduce stress.
This helps prevent premature tube failure during operation.
Reinstall Valve Core
Quickly install the valve core using a valve tool.
A brief air hiss is normal.
Do not overtighten.
Test for leaks with soapy water.
Stage 2: Final Inflation
Reinflate inside the cage to sidewall pressure, then adjust to working pressure.
Always stand to the side, outside the blast zone.
Final Check
Inspect all components.
Make sure the valve is centered and sealed.
Install a valve cap with gasket.

6. Tighten Lug Nuts in the Correct Sequence
This ensures even pressure on the rim flange,
prevents localized stress, and guarantees
proper sealing and safe installation.